
A game design document (GDD) is an overarching document that gathers all the critical information about designing a game. Explore the contents of a game design document, get templates for AAA, indie and solo dev scenarios, browse examples of GDDs for famous games, follow a veteran designer’s 9-step process for creating GDDs, compare different software options for creating a GDD, and learn why a game design document is a necessity for development.
Organize the GDD to address the team’s diverse perspectives through multiple sub-documents. Use the design document to highlight gameplay features, story and character details, game mechanics, and examples of artistic designs.
Coordinate with the development team to update the game design as soon as critical details change. Keep the GDD up to date to ensure all team members are working with the same information. Maintaining a thorough GDD helps simplify the entire game design process.
What is a game design document?
A game design document (GDD) is a master blueprint that defines the project’s core ideas, including the gameplay, story, environment design, and scope of the project. The GDD helps set the team’s expectations and keep everyone updated about the overall direction of the project. It plans out the overall structure of the game, thoroughly explores the features needed to craft that experience, and ensures each feature is usable and iterable.
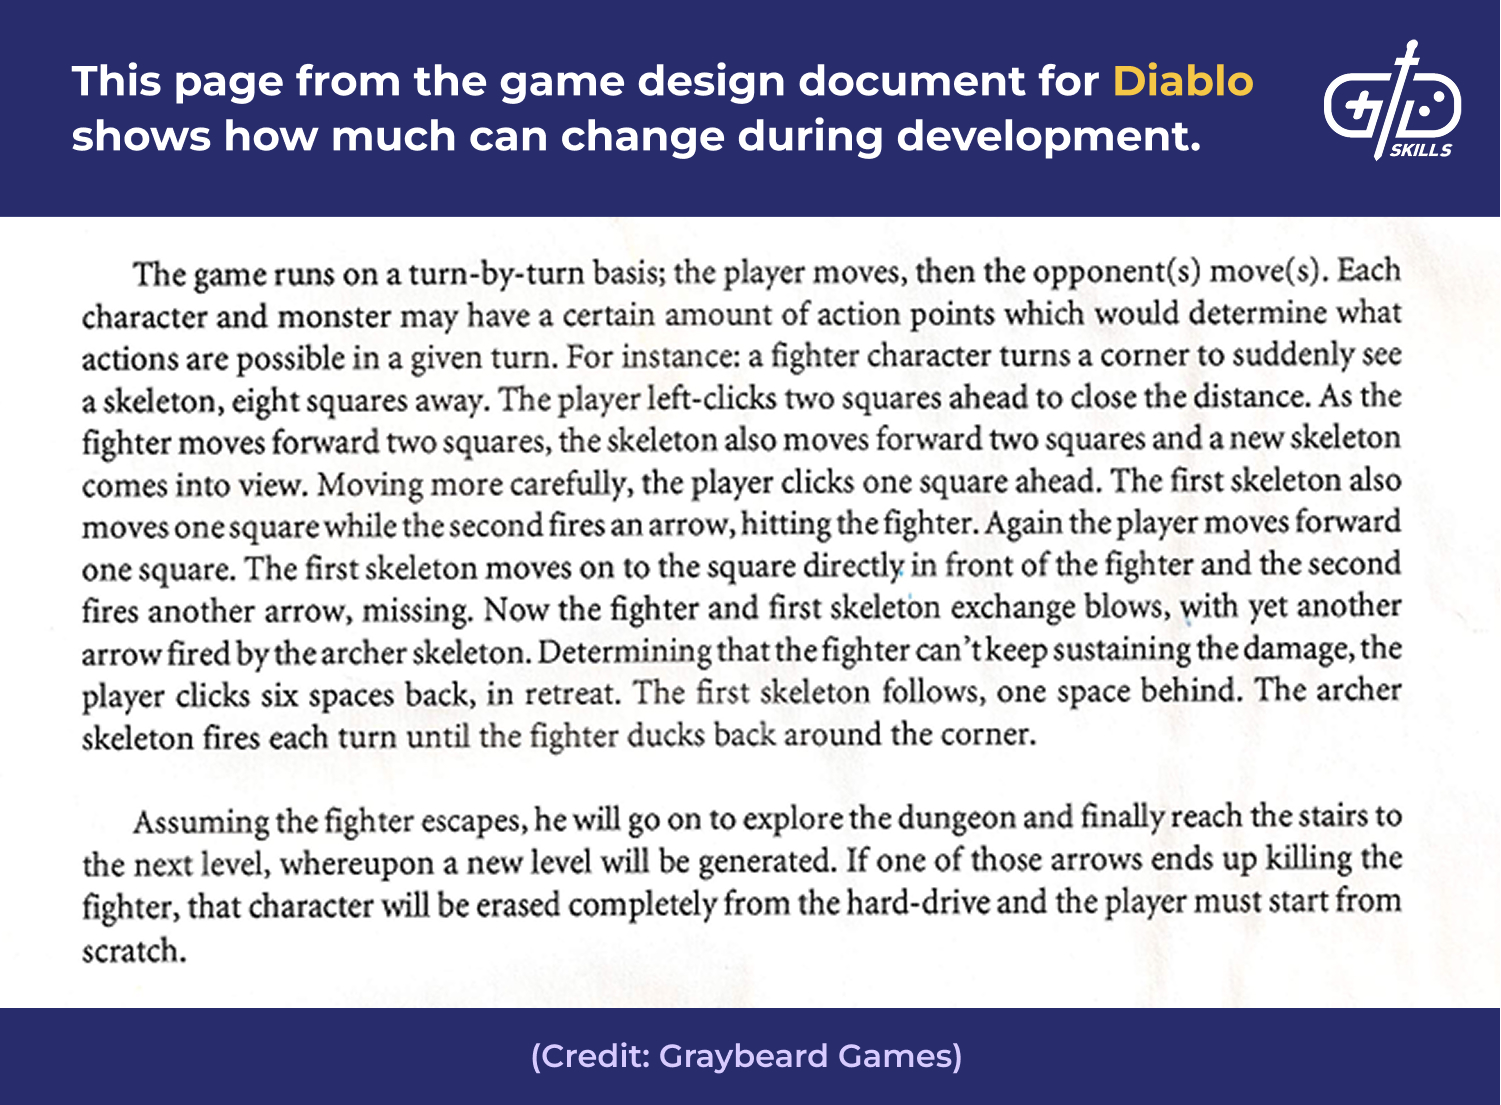
Game design documents are used to align developers, publishers, and investors behind one concept for a game or feature. The development team refers to the GDD continuously. A GDD covers the big-picture foundational pillars of the game’s design, but the finer details always change during development—that’s part of the process. This page from the GDD for Diablo certainly sounds a little different from the version we all know and love.
AAA teams, indie developers, and solo creators have different requirements for their documentation, and intermittently join or leave the project partway through. The development team members each have different feedback to offer based on their unique perspectives. Artists, programmers and level designers all picture the layout of a navigable overworld differently.
The value of a GDD is its ability to communicate each specialized perspective to every other member of the team. Interdepartmental communication is already hard enough, so, to be safe, OVER-DOCUMENT everything!
Where to get a game design document template?
To get a game design document template, download one of 3 free detailed templates. Choose the game design document template and layout best suited to the project goals and team size.
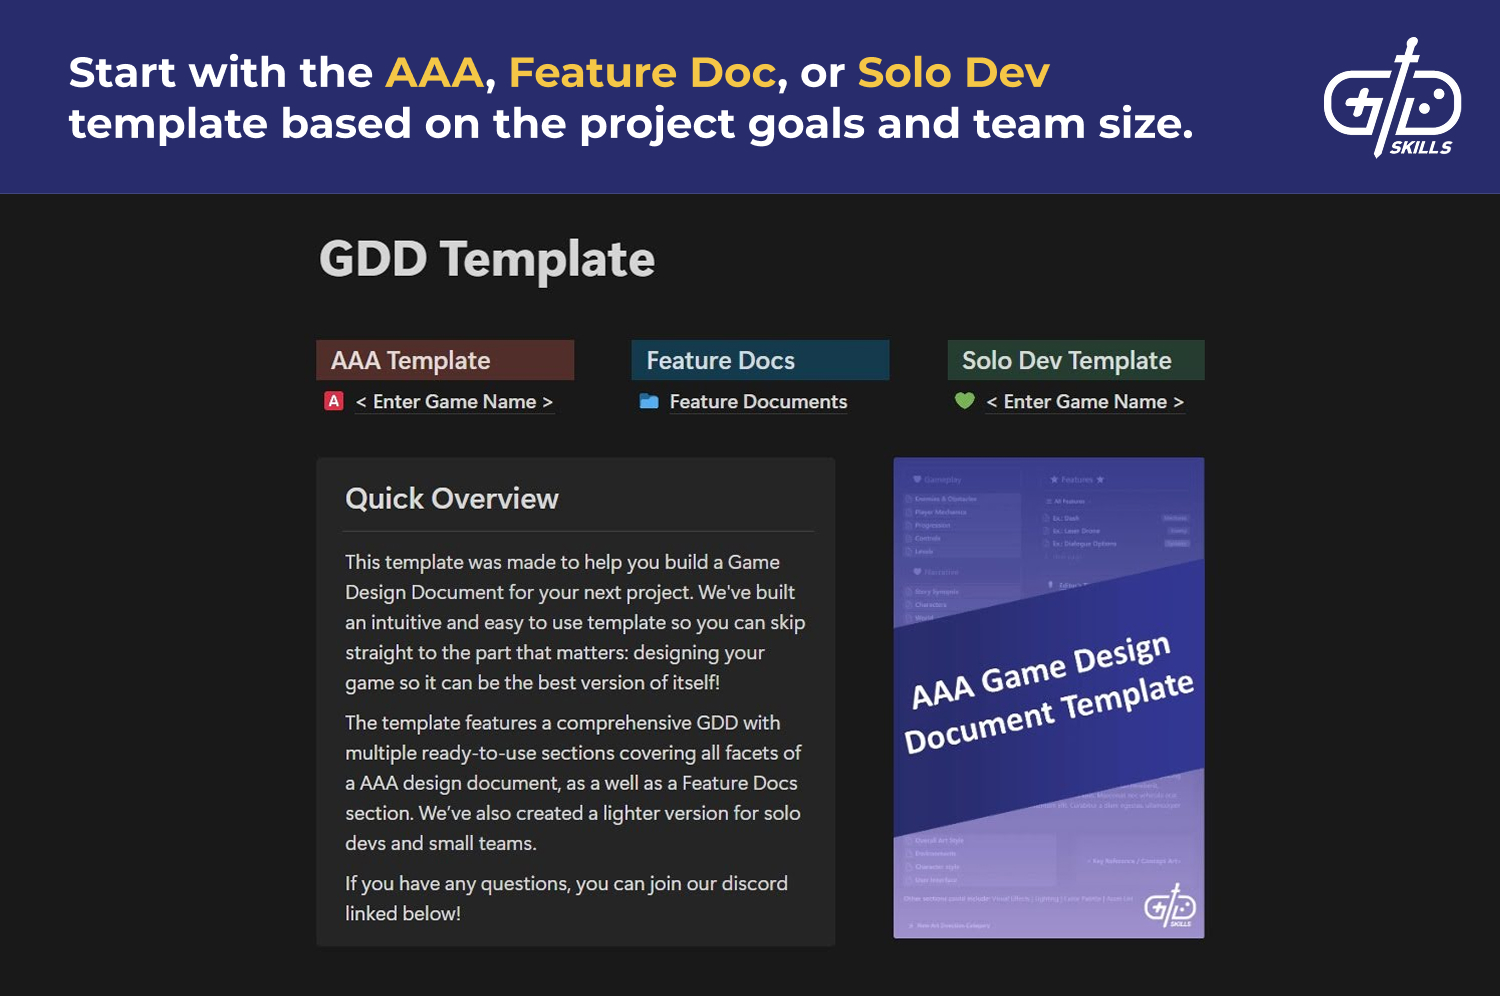
Each game design document template was created with a different development scenario in mind. The GDD is always going to be unique, but it’s still important to follow a general structure that organizes the key details about the game or feature in a visually intuitive way.
What are the examples of game design documents?
The examples of game design documents are learning materials that demonstrate the structure of a finished GDD. Notice that the examples range from early skeletal outline PDFs to a 300-page doc complete with concept art, technical designs and detailed gameplay aspect descriptions. Compare each of the 13 examples of game design documents listed below.
- Grand Theft Auto (originally “Race’n’Chase”) GDD
- Fallout: Brotherhood of Steel 2 GDD
- Silent Hill 2 GDD
- Diablo pitch (early GDD)
- Deus Ex (“Majestic Revolutions”) GDD
- Bioshock pitch (early GDD)
- The Doom Bible (extensive GDD)
- Monaco GDD
- Dirty Bomb (300+ page GDD)
- Azrael’s Tear (“Raptor”) GDD
- Tron GDD
- StarFox 2 GDD (in Japanese, but with many interesting sketches)
- Apocalypse Now GDD
Each game design document example is for a finished, famous game. The design documents were sourced from /r/gamedesign, Mikael Segedi’s collection, and gamedocs.org.
How to make a game design document?
To make a game design document, organize the critical information into a structured and visually appealing document. The ideal methodology to create a game design document depends on the team size, studio, and overall complexity across the AAA, indie, and new solo dev scenarios. Detail the gameplay and story context, mechanical input, and visual or audio aspects.
Remember that a GDD is a living document that evolves alongside the project itself. Build an early prototype as quickly as possible. Read over the following tips, which apply to any game developer but are especially important for first-time devs.
- Keep the design simple. Do NOT feel the need to solve everything.
- Divide the process into sub-documents to be completed later. Create a to-do list.
- Don’t waste effort perfecting each feature. Cutting problematic features at a later step is part of the process.
- Only make the doc as long as is needed to organize the most important ideas. No one reads ridiculously long documents.
Avoid the common design trap of overthinking the early stages, then finding out that the feature is too resource-intensive or simply unfeasible. Putting together a great GDD and having something playable to present are equally important for breaking into the industry. Make prototyping mistakes quickly enough to iterate upon and improve the playable prototype.
What are the main components of a game design document?
The main components of a game design document are the Master Document and one or multiple Feature Documents. Write a Master Document that details the overarching plan for the game or feature. Include Feature Documents that outline specific features and contextualize each feature’s role within the game.
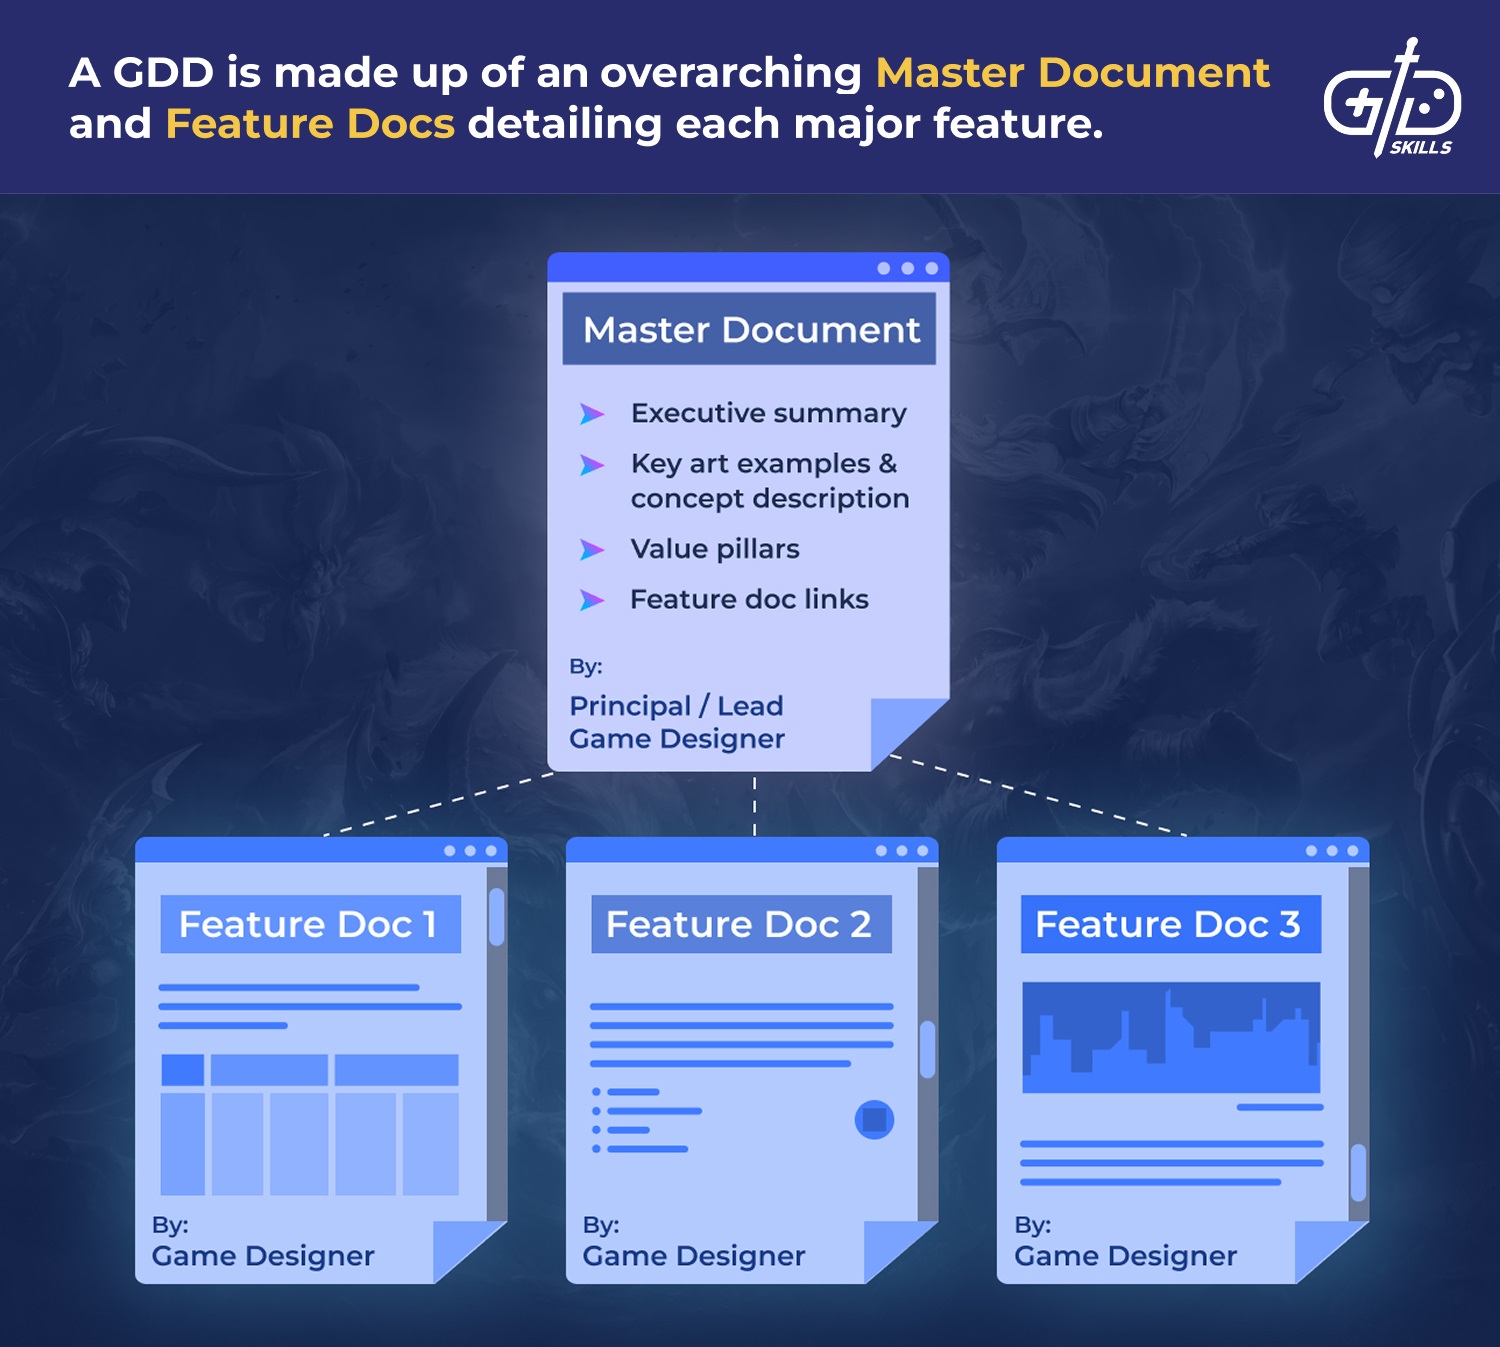
Outline the master document as a short, goal-oriented doc aimed at designers, engineers and artists, written by the lead Game Designer. Include an executive summary of the overall experience, key art with brief descriptions to communicate the main game concepts, the game’s value pillars, and a list of links to individual Feature Documents.
Create Feature Documents that focus on a single aspect of the game design to outline the goals, mechanics of how the aspect works, and desired player experience. Make one Feature Doc for boulder traps, another for the player’s hookshot power-up, and a third to cover how the adaptive music system works, for example.
Communicate with the team consistently throughout the design process. Each doc must explain the essentials as clearly and succinctly as possible.
How to create the outline for a game design document?
To create the outline for a game design document, build a Director’s Vision document, simplify the information in a One-Pager, detail a Prototype Requirement Document, produce a Creative Brief, assemble the Feature Document, include a Levels of Quality document, outline the UI/UX document, construct a Feature Sign-Off document, and add a Narrative/Localization document.
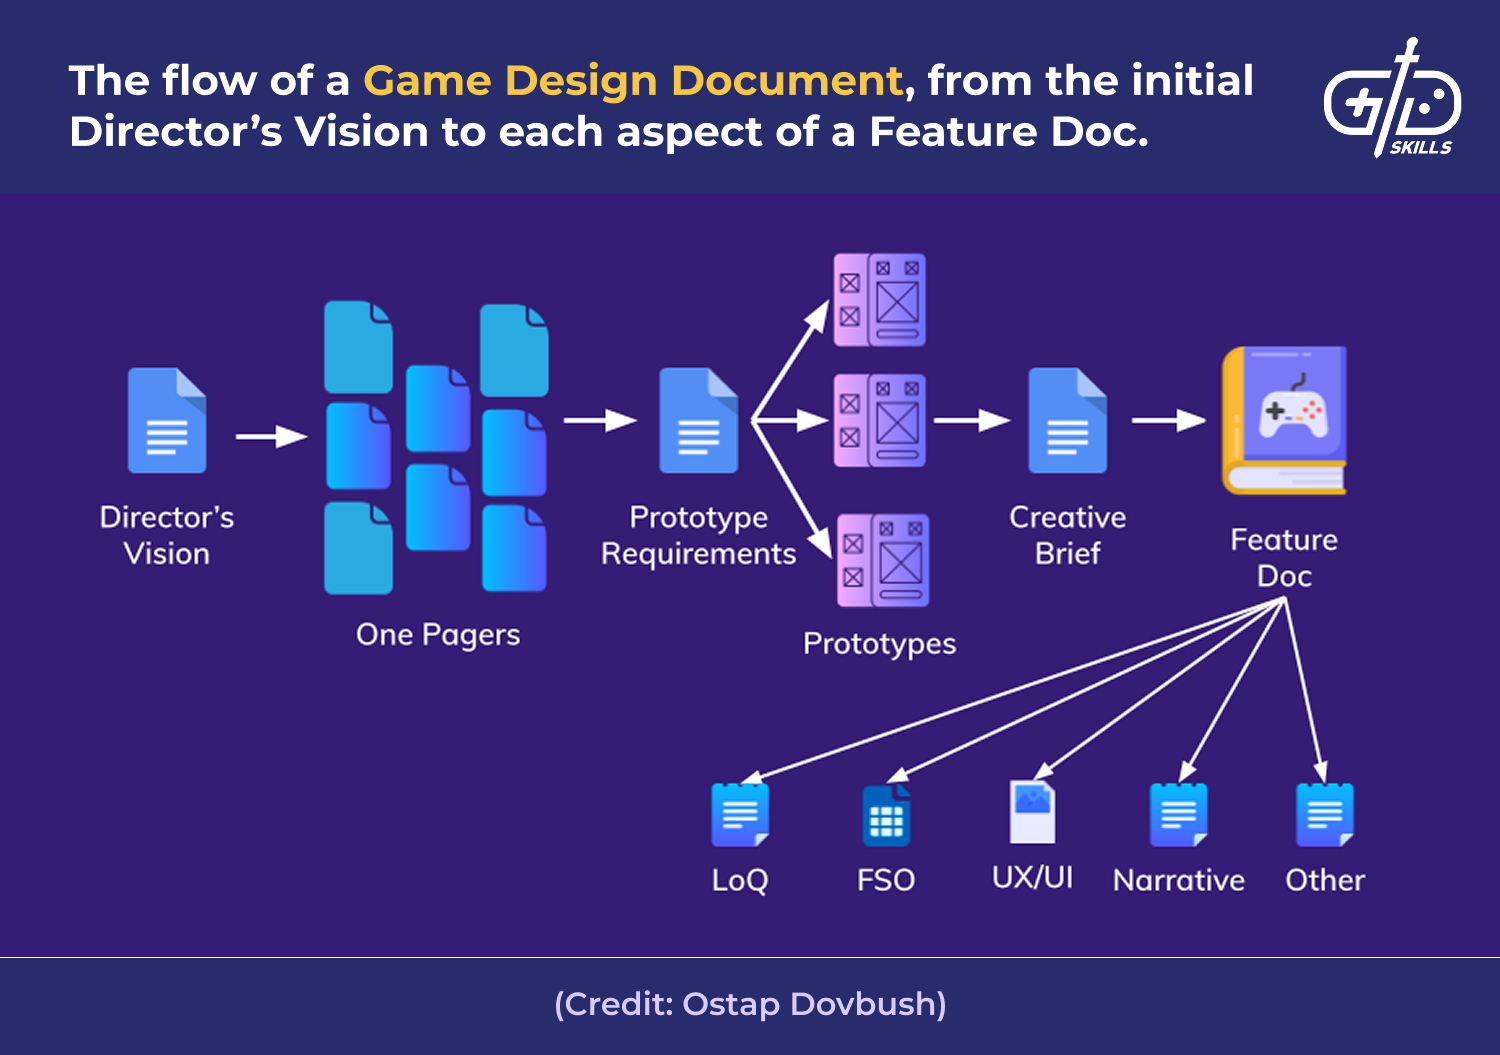
Put together the game design document outline using the following 9-step GDD ideation process.
1. Build a Director’s Vision document
Construct a Director’s Vision document, a one-page doc that provides all the information needed for a Game Designer to contribute their expertise. Enlist a Game Director to oversee the entire process from feature birth to approval. The Game Director also writes the Director’s Vision document.
Have the Game Director vouch for each chosen idea by providing a formal approval document detailing the request. Follow the same process when a Game Designer or team member comes up with the idea initially. Use the Director’s Vision document for an imaginary game below as an instructive example.
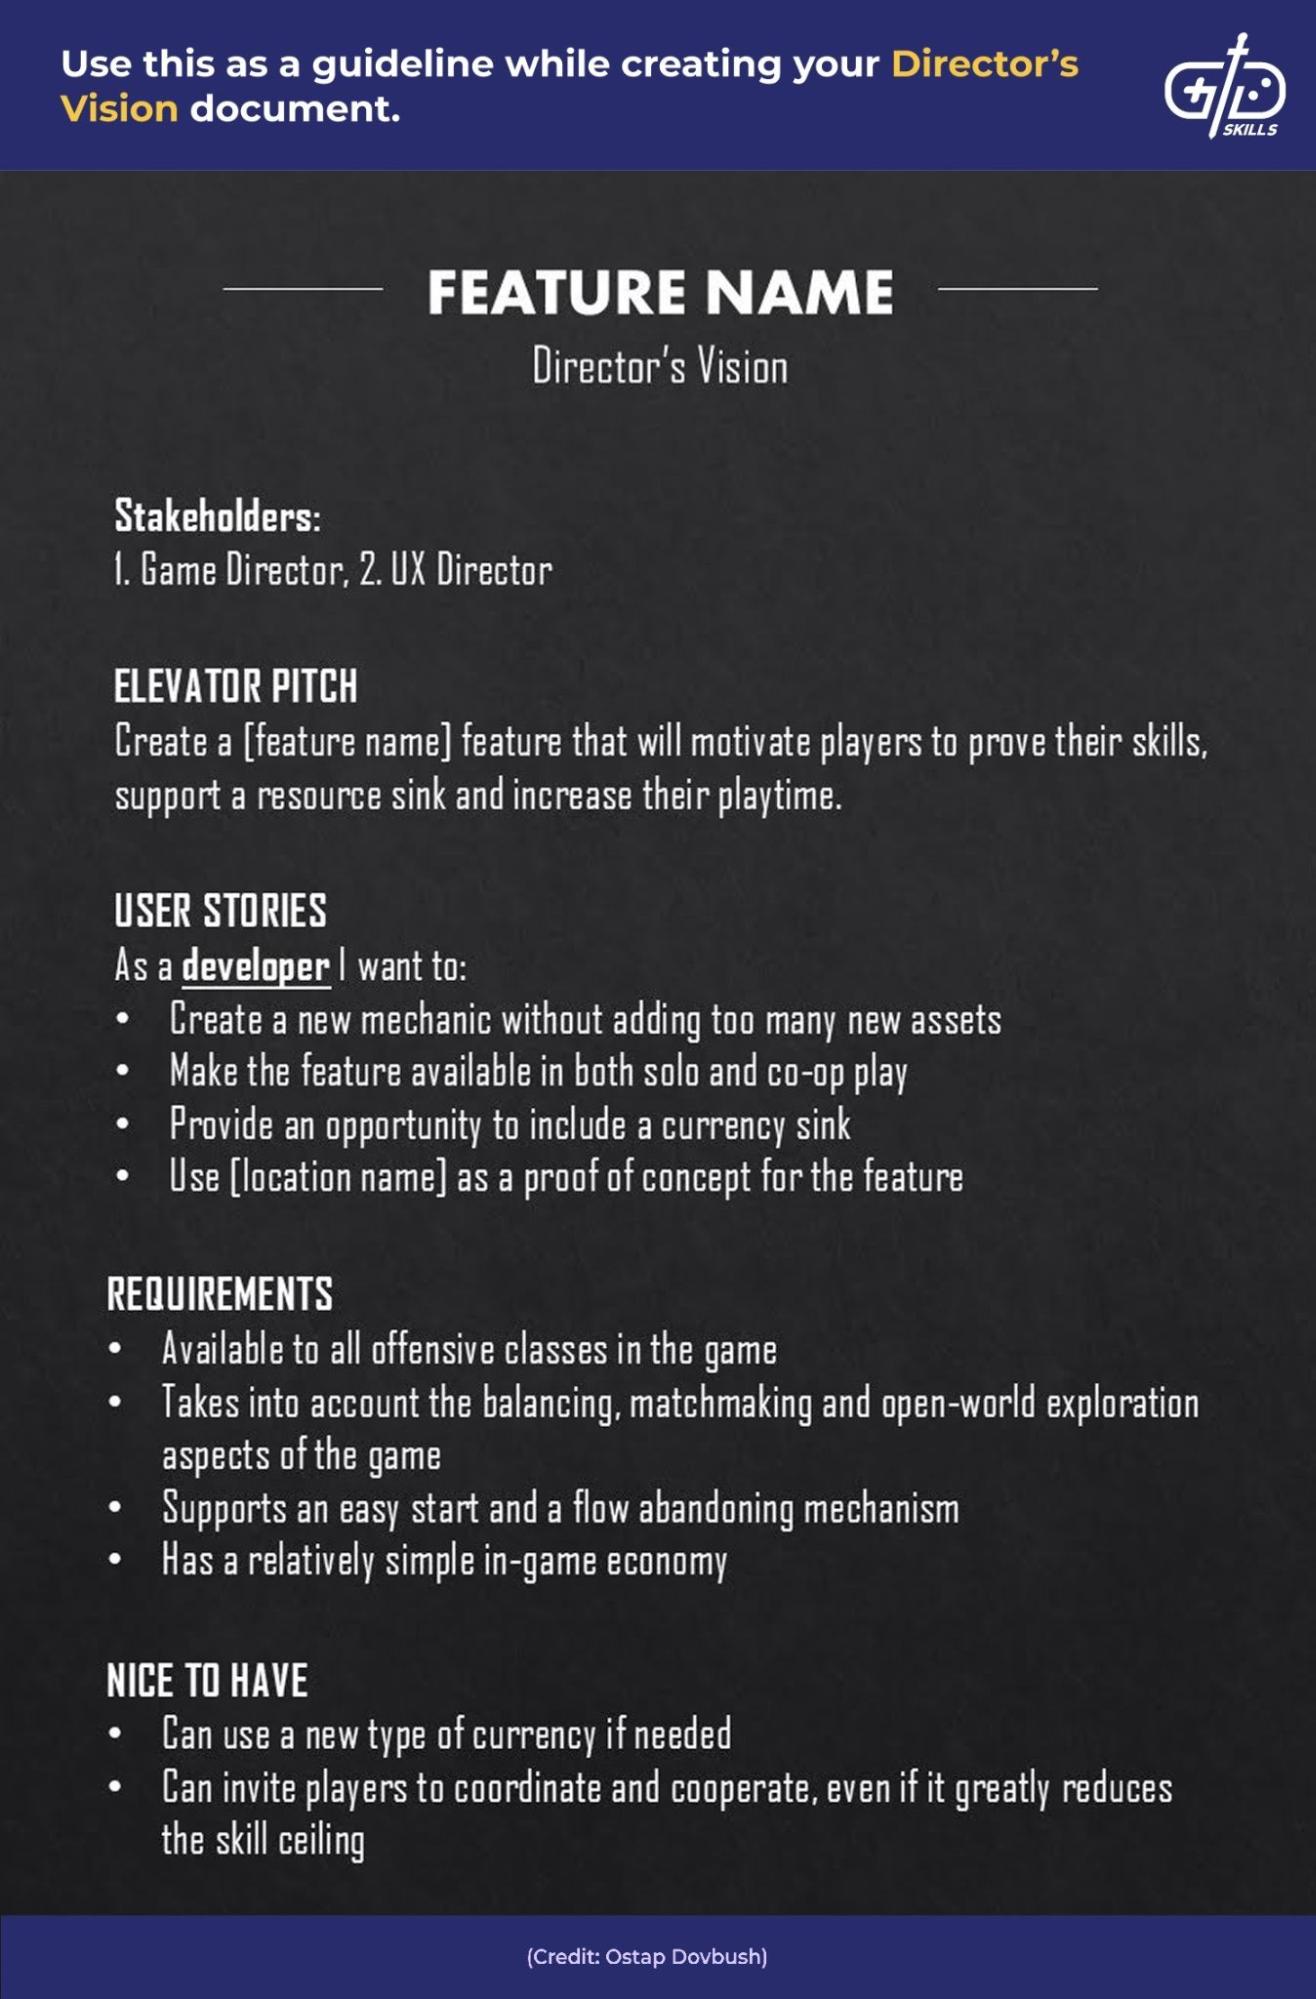
Include a Director’s Vision document to make the life of a Game Designer easier by guiding readers through the brainstorming phase. Write the document to clearly contextualize the feature within the broader context of the whole game.
Help streamline the future validation and iteration process by adding this design doc. The Director’s Vision is a Game Designer’s North Star.
The following chapters ought to be mentioned in the Director’s Vision document.
- Stakeholders: Stakeholders are the people that requested and validate the feature along the way. List everyone invested in the game or feature in the chapter. Explain their role in the game or feature’s development.
- Elevator pitch: Write a single sentence that fully describes the feature. The elevator pitch is short and attention-grabbing enough that the game or feature is able to be explained faster than an elevator moves between floors.
- User stories: Outline the different perspectives and expectations from which people approach the game or feature. Players want the feature to do a specific thing in the game. Developers want the feature to use specific technology and grow in functionality.
- Requirements: The feature receives an assignment of scale and quality: Gold, Silver, or Bronze status. A Bronze feature just has to exist and work properly, but not outshine features in competitors’ games. Players interact with Gold features frequently, so Gold features must be as rich and polished as possible. Applying this status helps provide clear boundaries within which Game Designers operate.
- Features: Detail the relationship between the game or feature and the existing features. Aim to create a new Interactable Ingredient to be used by other features in the game. Designing new features that build upon existing features is a critical consideration during development.
- Constraints: Determine the game or feature’s necessary constraints. Analyzing the constraints early in the process makes them easier to plan around during development. Deciding whether a feature is for solo or multiplayer/co-op use already provides a great deal of information for the creative process, for instance.
2. Make a One-Pager
Write a concise One-Pager that condenses the most useful information about a game into one quickly scannable page. Including a One-Pager is extremely popular in the industry.
Jump into the brainstorming phase and fill in the following information immediately after receiving the Director’s Vision document. Detail the exact feature that satisfies the requirements, its parameters, similar features that exist in other games, and the kinds of novelty and adaptability to be added.
Use the One-Pager format in cases with many questions and at least a dozen worthy answers. Look at the density of information included in the early One-Pager for Watch Dogs: Legion below.
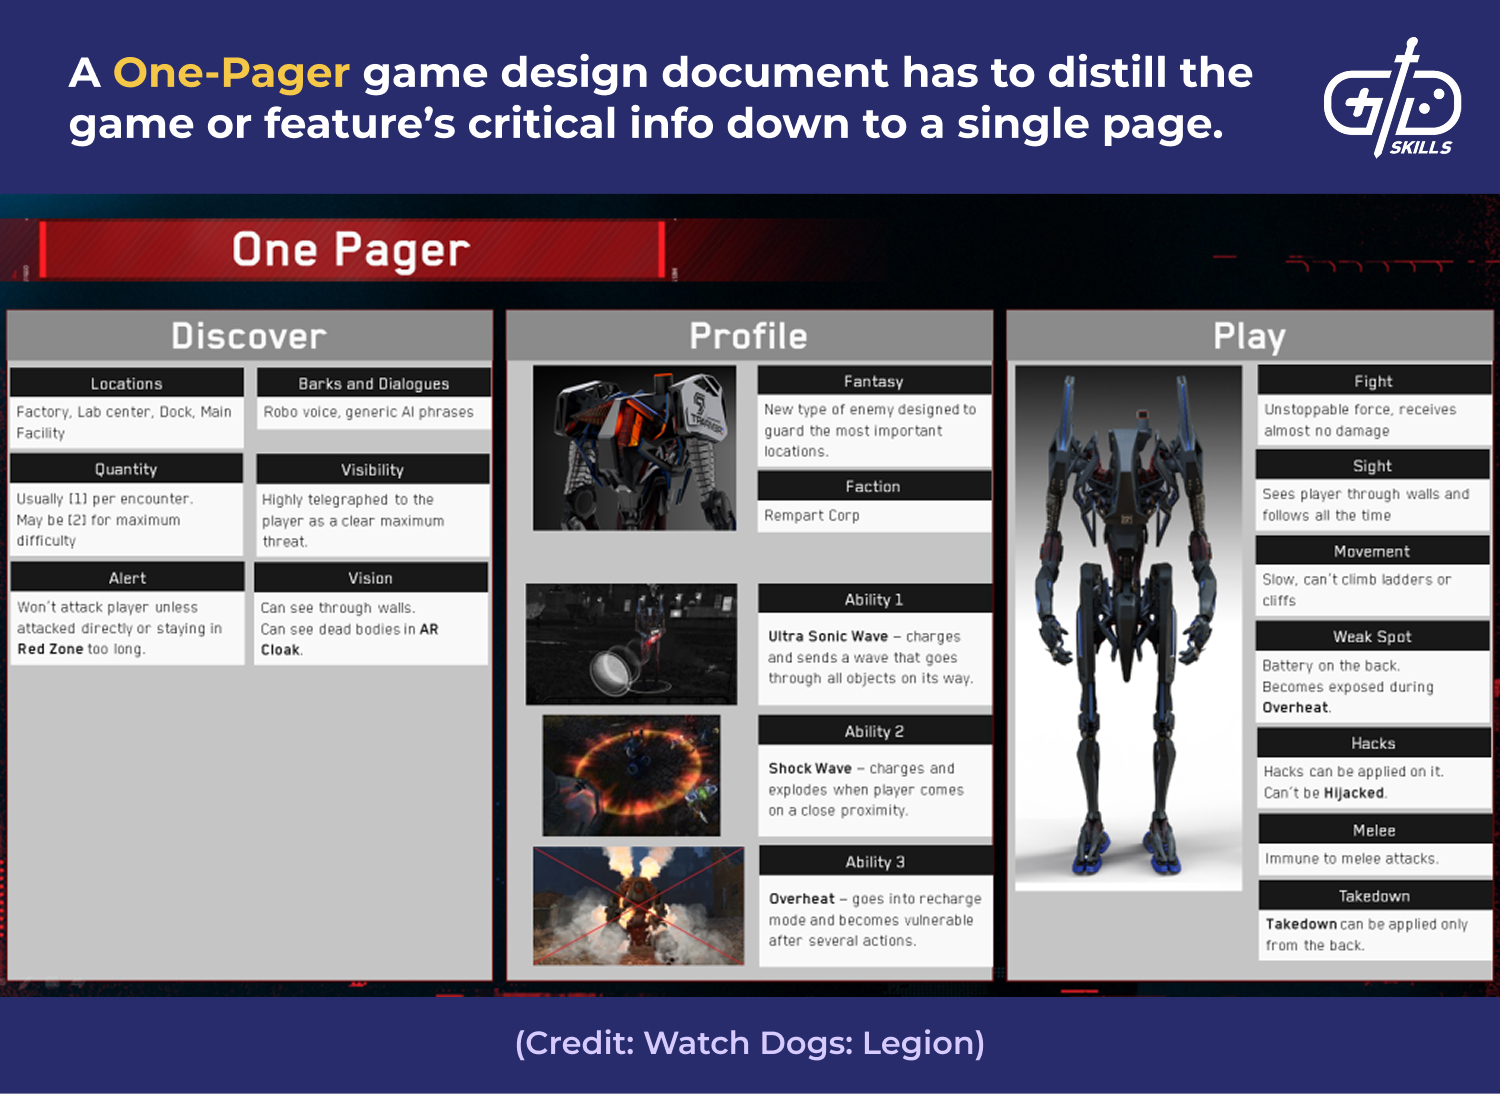
Create a One-Pager to help digest the team’s brainstorming efforts into a readable and clear format. Brainstorming a new skill for a character requires a specific number of variants that each needs to be put on paper, described, and have the pros and cons listed, for instance.
Include a One-Pager to take advantage of its many benefits. Being a single page makes the One-Pager easy to read and quickly compare with competing ideas. Including a One-Pager simplifies the Game Director’s job of deciding to make further adjustments to a feature or to validate and push the feature ahead.
Design the One-Pager to be modular and easily adaptable to a particular feature’s needs. An effective One-Pager about comparing monsters emphasizes their behavior and strong vs. weak points, while one detailing a new game mode describes the rules, scoring methods, and winning strategies.
Note that the usual result is to have 10-15 One-Pagers for one feature brainstorm. 30% are copies of similar features in other games, 40% are an homage to the already existing feature or add a new twist, and 30% are completely unique ideas that come from many sources of inspiration.
3. Create a Prototype Requirement Document
Write a Prototype Requirement Document that details everything needed to create a playable prototype of the feature. Include a Prototype Requirement Document in cases with multiple One-Pager candidates to take the spot of an in-game feature. Adding this doc allows the Game Designer to compare each candidate quickly.
Determine how the feature behaves, the assets used, unique assets to be created, the method for the player to control the feature with 3C, the conditions under which the feature is testable, and the debug or console commands necessary for quick tuning when prototyping and testing a new feature.
Remember the goal of the prototype and associated documentation: decide whether it’s a “GO” or “NO GO” with minimal effort. Use the scenario below as an example.
- Create a new Gadget: “Combat Amplifier”.
- Make the Gadget throwable within a designated throwing distance on the ground and sticks to the surface.
- Give the Gadget an area of effect of [10m radius].
- Set the life duration of the Gadget to [30 sec].
- Make the Gadget temporarily increase the player’s damage output by [+40%] while staying in the area of effect.
- Allow the Gadget to affect both the player and allies within the area of effect.
- Assign the Gadget a temporary icon and description.
4. Produce a Creative Brief
Build a Creative Brief, an expanded version of a One-Pager that describes the main aspects of a game or feature before officially entering production. Write the Creative Brief once the prototype is ready, after selecting the feature that satisfies the request. Look at the key slides from the Creative Brief for Watch Dogs: Legion below for an example of how the document looks in practice.
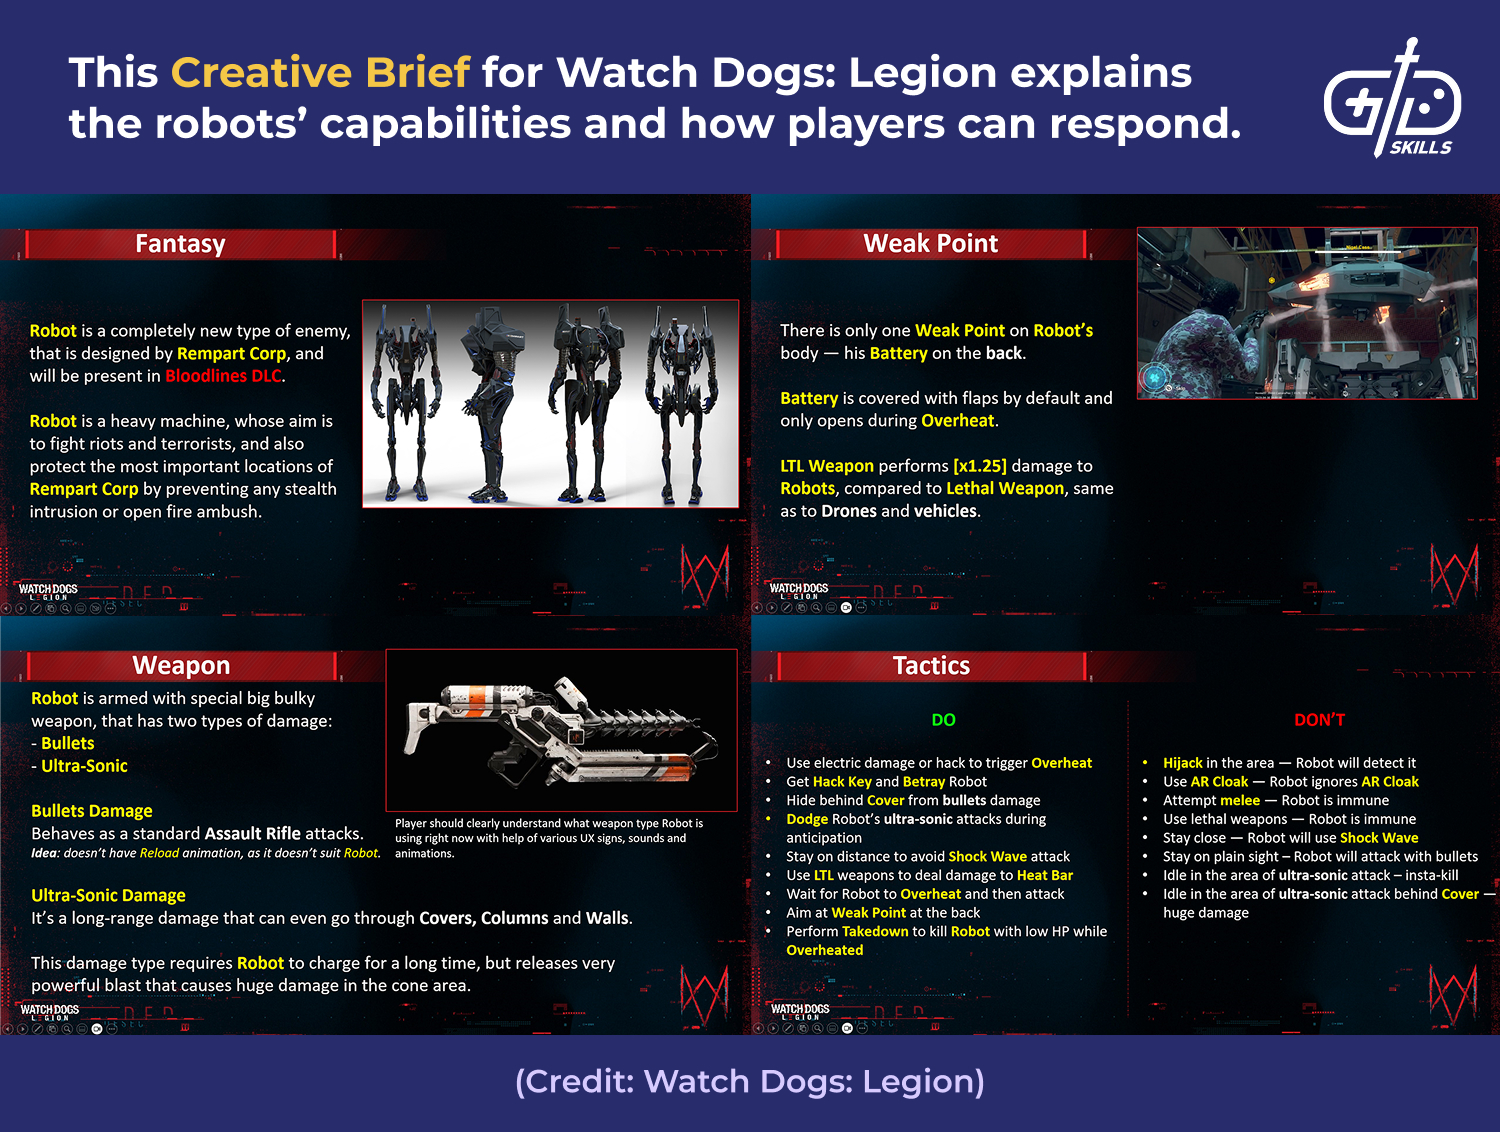
Increase the Creative Brief’s effectiveness by formatting the document as a slideshow presentation of 20-30 slides. Include the following chapters: Overview, Gameplay and Rules, UI, Progression/Formulas/Balance, Summary and Known Pros and Cons, and References.
Write the Creative Brief while remembering to keep things simple with one sub-feature per slide, add visual references from in-game assets or other media, including interactable animations, and specify reference numbers, such as a weapon’s clip size or spell’s casting time.
Keep in mind that all of the above docs come long before the actual production phase. Conceptualizing new parts to add is possible even at the Creative Brief stage of the process.
5. Assemble the Feature Document
Organize a Feature Document that translates all the data about a specific feature into a readable format. Fill the Feature Document with extensive details about the game or feature to ensure the design document is usable by the whole production team.
Include all the feature rules, gameplay elements, references, behaviors, and links to other features. Write the Feature Doc as a page in a wiki-library, such as Confluence, Notion or Google Docs. Below is a breakdown of every aspect a Feature Doc should include.
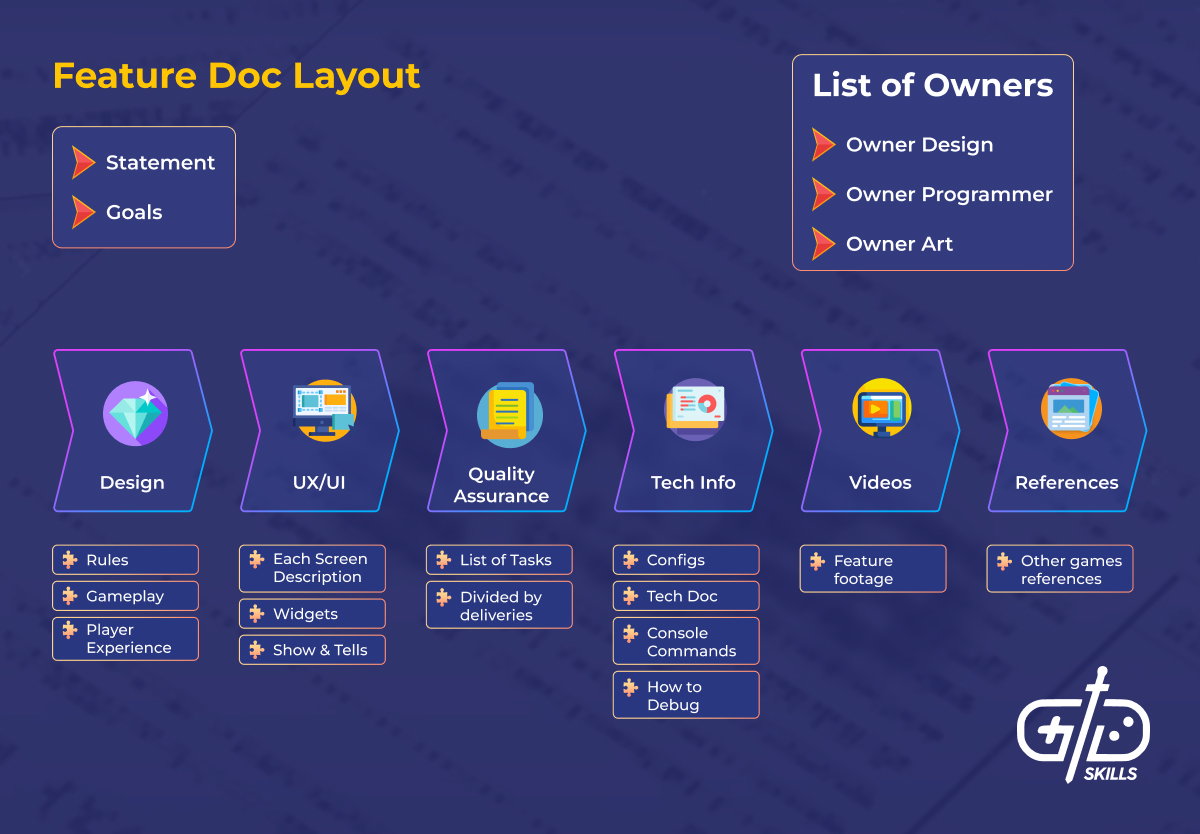
Add chapters that support the feature, covering its technical and configuration details, a list of all console commands, or a table with videos, when relevant to the project. Keep in mind that, even after performing all the reference checks, brainstorming and validation sessions, the feature is only about 60% ready compared with the version that later accompanies the full development of the feature.
Keep the Feature Document up to date constantly. Note all changing details that are only able to be put to paper after multiple iterations. Maintaining accuracy and a high level of detail in the Feature Doc is the main point of effort for a Game Designer.
Remember that Feature Docs have multiple owners. Encourage each team member to add their own input. Ask a programmer to create chapters about a specific class implementation, or request that the Level Designer provide a map of spots at which the feature is usable.
Include a Backlog Ideas or Future Release chapter in the Feature Document’s latter sections to preserve the initial concept. Parts of the document are going to change. Features are planned to have a certain scope, but not everything goes into the final release.
Complete the project’s 5 essential documents above, then move on to writing the project’s supporting documents. Include 4 kinds of supporting documentation in a thorough GDD for a planned AAA game: a Levels of Quality (LoQ) document, a UX/UI document, a Feature Sign-Off (FSO) document, and a Narrative/Localization document.
Evaluate the project’s needs before determining which supporting documentation is required. For indie or first-time devs, not every document makes sense to include with each project. Use the relevant docs to layer specific details and goals onto the base GDD.
6. Include a Levels of Quality (LoQ) Document
Write a Levels of Quality Document that lays out the method to implement a feature and the order in which to develop each aspect. Divide the process into 5 levels of quality following the logical implementation order below.
Consider L0 to represent the core feature mechanics. Re-use the Feature Prototype here. L1 is the feature’s main mechanics and parts of the UI. L2 is a feature-ready state with all the main mechanics and final UI on the main widgets implemented. L3 contains references to supportive features (Telemetry, Narrative pass, SFXs, VFXs and UI are final). L4 is the final polishing phase, tuning the shippable content.
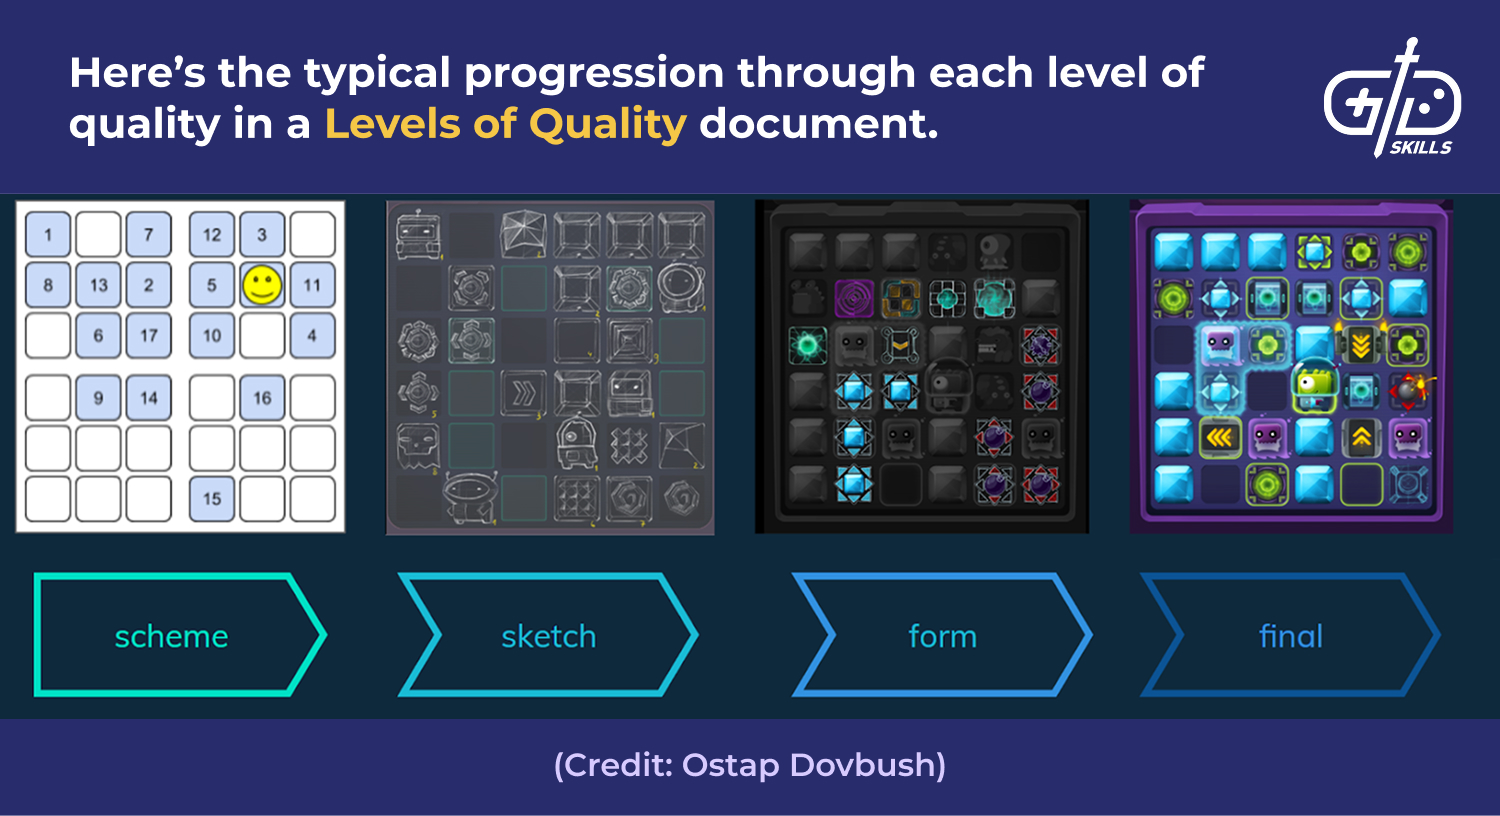
Design the LoQ document to be a mix of the Game Designer’s vision for the feature’s important pieces and the production planning and implementation processes. Have the Game Designer provide the document initially, then request for each team member to clarify the details.
Use the following scenario as an example. The Game Designer says that on L0, it’s enough for a feature to work only in one game mode inside a GYM (dedicated development map inside a game editor). For L1, the designer wants to see the feature already appearing in the World Map. For L2-L3, the feature needs to be rolled out in all locations players encounter it.
7. Detail the UX/UI Document
Create a UX/UI Document that explains the game’s user interface and user experience. Include details about how players actually see and interact with a feature. Review the following UX/UI doc for the robots in Watch Dogs: Legion to see how the document works in practice.
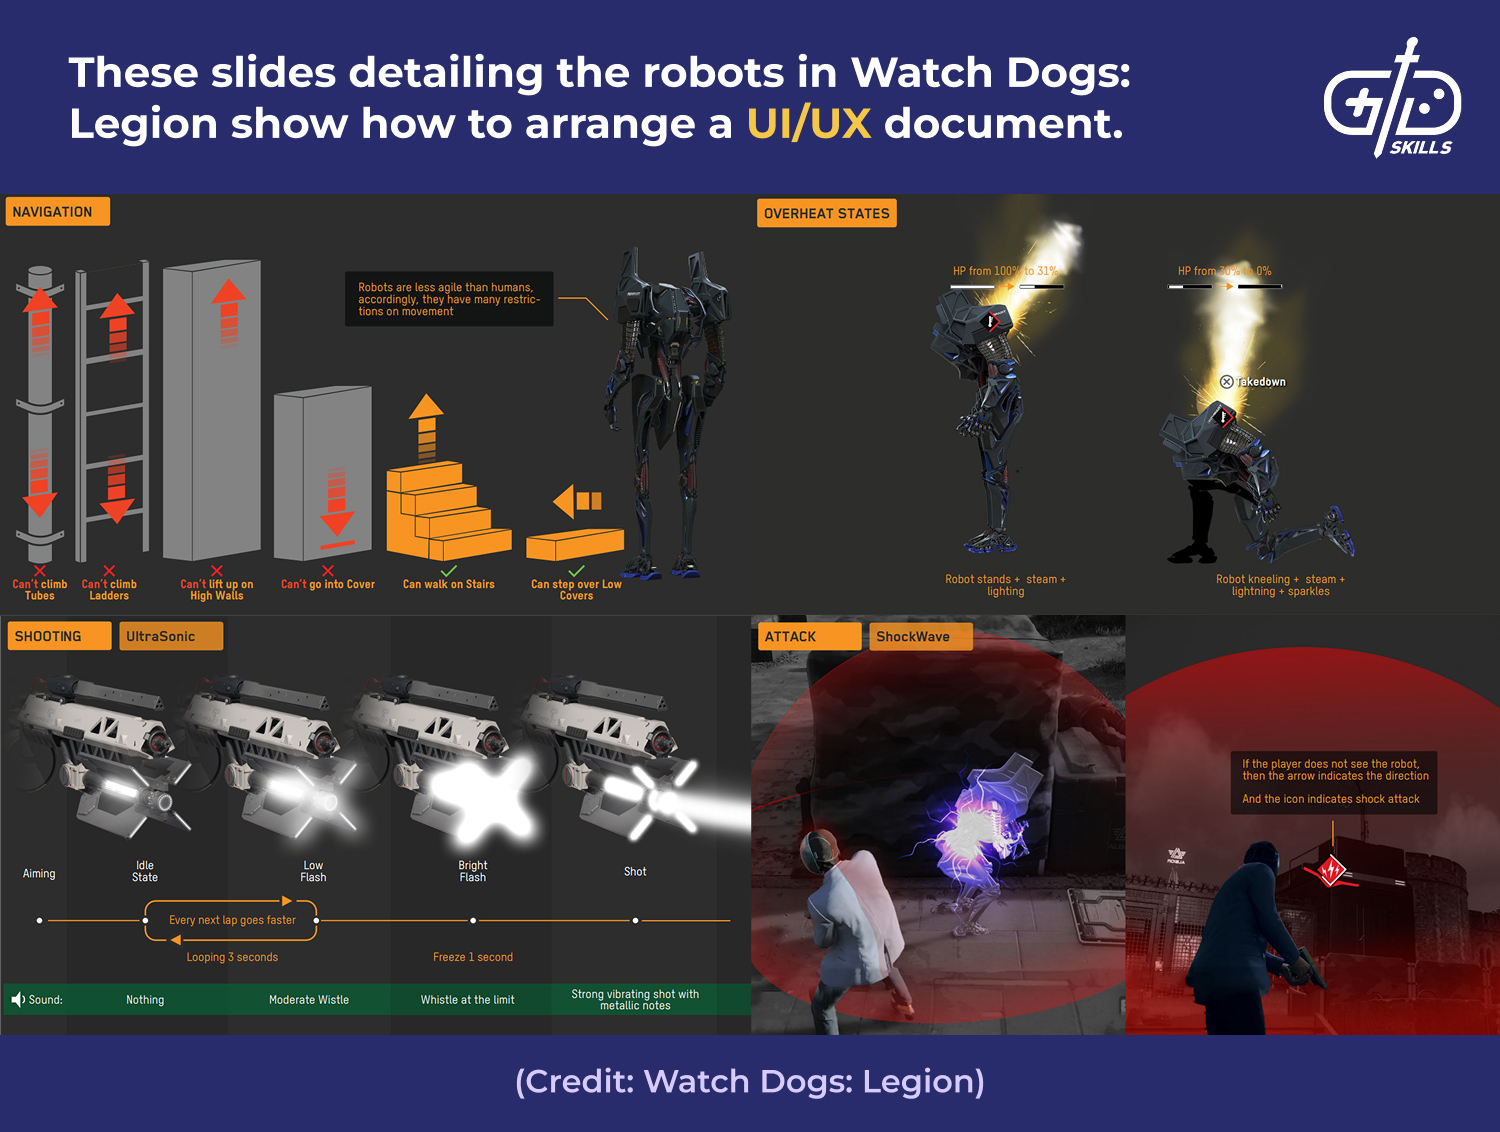
Include all the relevant information from the overall GDD in a predominantly visual form in the UI/UX Document. Explain how the player interacts with a feature, whether the feature has a dedicated UI, the UI’s flow, the conditions under which widgets appear on-screen, and non-UI behavior like VFX, sounds or controller vibrations.
Use the rest of the documentation to discuss the feature in a systematic way for the programmers’ sake. Remember that the game’s players are guided by the UI and UX design 80% of the time, though. Format the UX/UI Doc in a Figma file or a suitable document to accommodate all the creativity contributed by the visual designers.
8. Construct a Feature Sign-Off (FSO) Document
Build a Feature Sign-Off (FSO) Document that outlines key feature details line-by-line in a table. Using the FSO format allows tasks to be quickly assigned and simplifies the process of QAing each line separately.
Create a Feature Sign-Off Doc table with each line containing one statement. Ensure each statement is implementable by a programmer and easily validatable by a Tester. Though rare today, the FSO was once popular in Ubisoft games production. Use the FSO from Eurogamer’s “Designing Assassin’s Creed II” article below as an example.
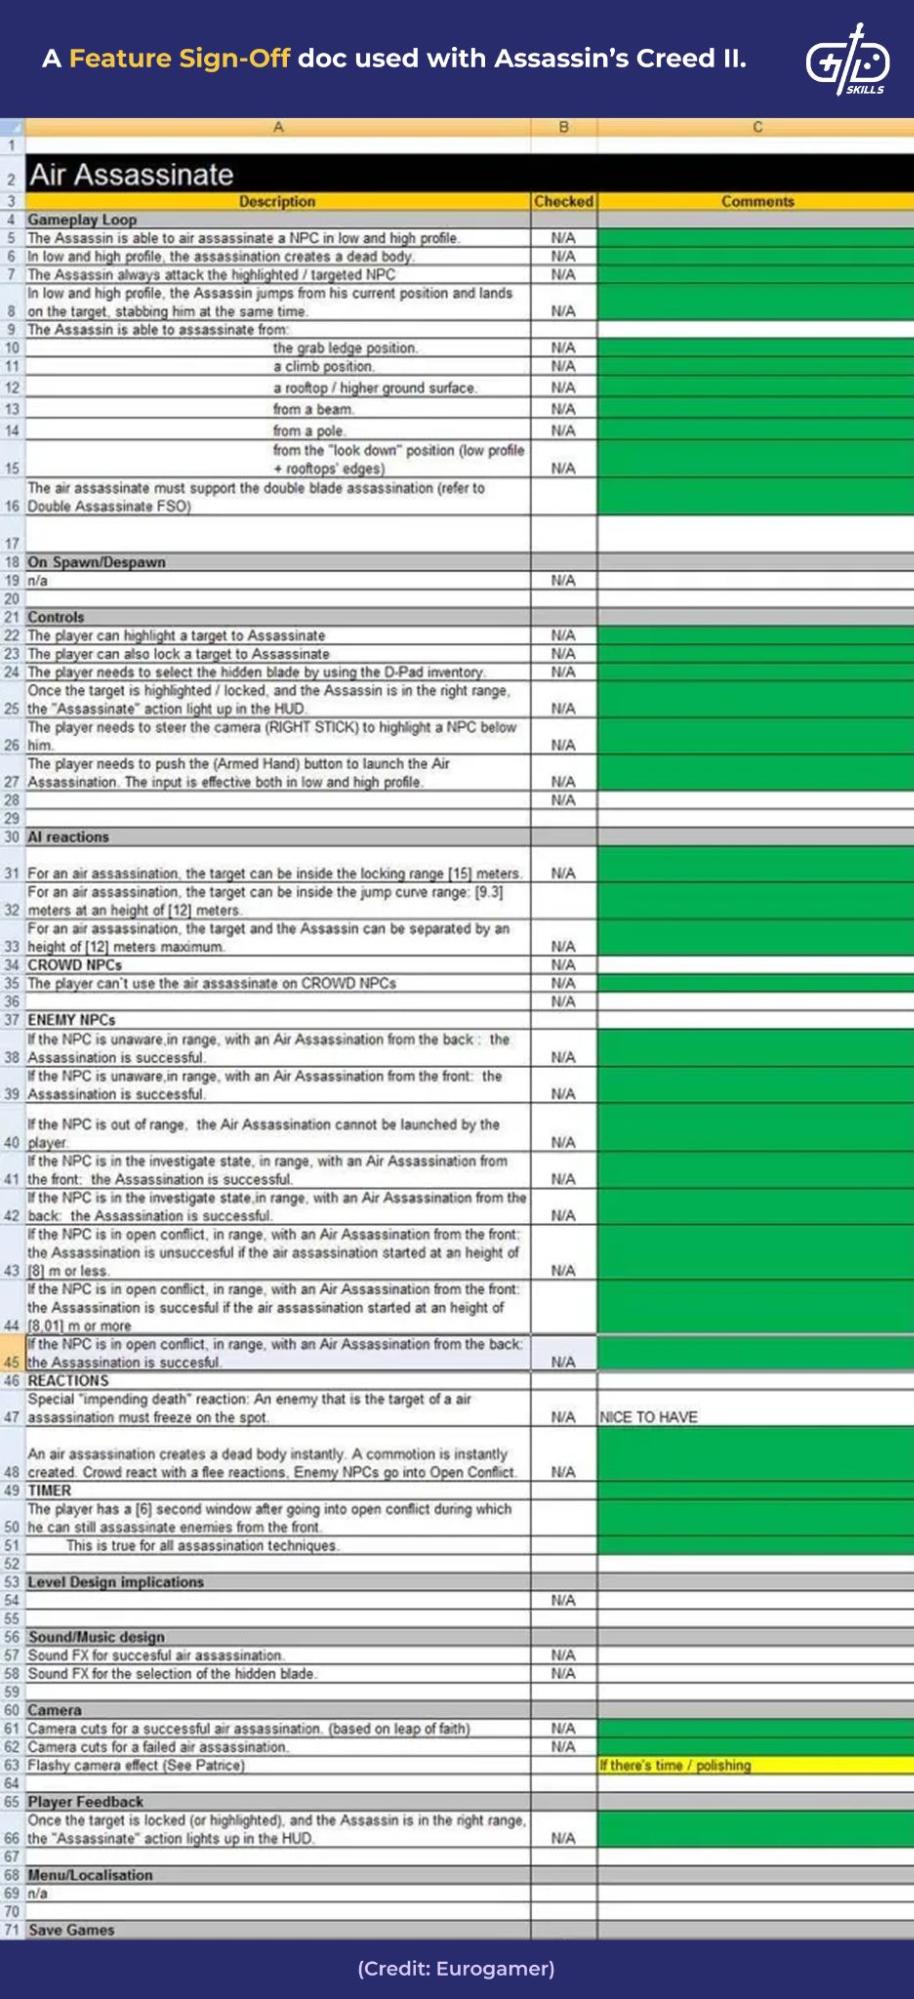
Note that the FSO document requires the highest level of responsibility and concentration from a Game Designer. Each line’s statement is capable of creating a bug in the game.
Consider the following example. A Game Designer states in the document that the Smoke Bomb Ability effect lasts [5 sec]. Determine whether the feature has been implemented, then whether the feature is true for a current build. When true for the current build, the behavior of the Ability works as intended. When untrue, the Ability is short enough to be cancelable by a Flash Bomb, unfortunately.
9. Add a Narrative/Localization Document
Include a Narrative/Localization Document to provide all the information needed by each localization team. Use the Narrative/Localization Document to simplify the process of translating key details into multiple regional dialects.
Prepare screenshots of all the relevant text for the feature and put them into the presentation document. Use the imaginary mockup example doc for a released game below as an example.
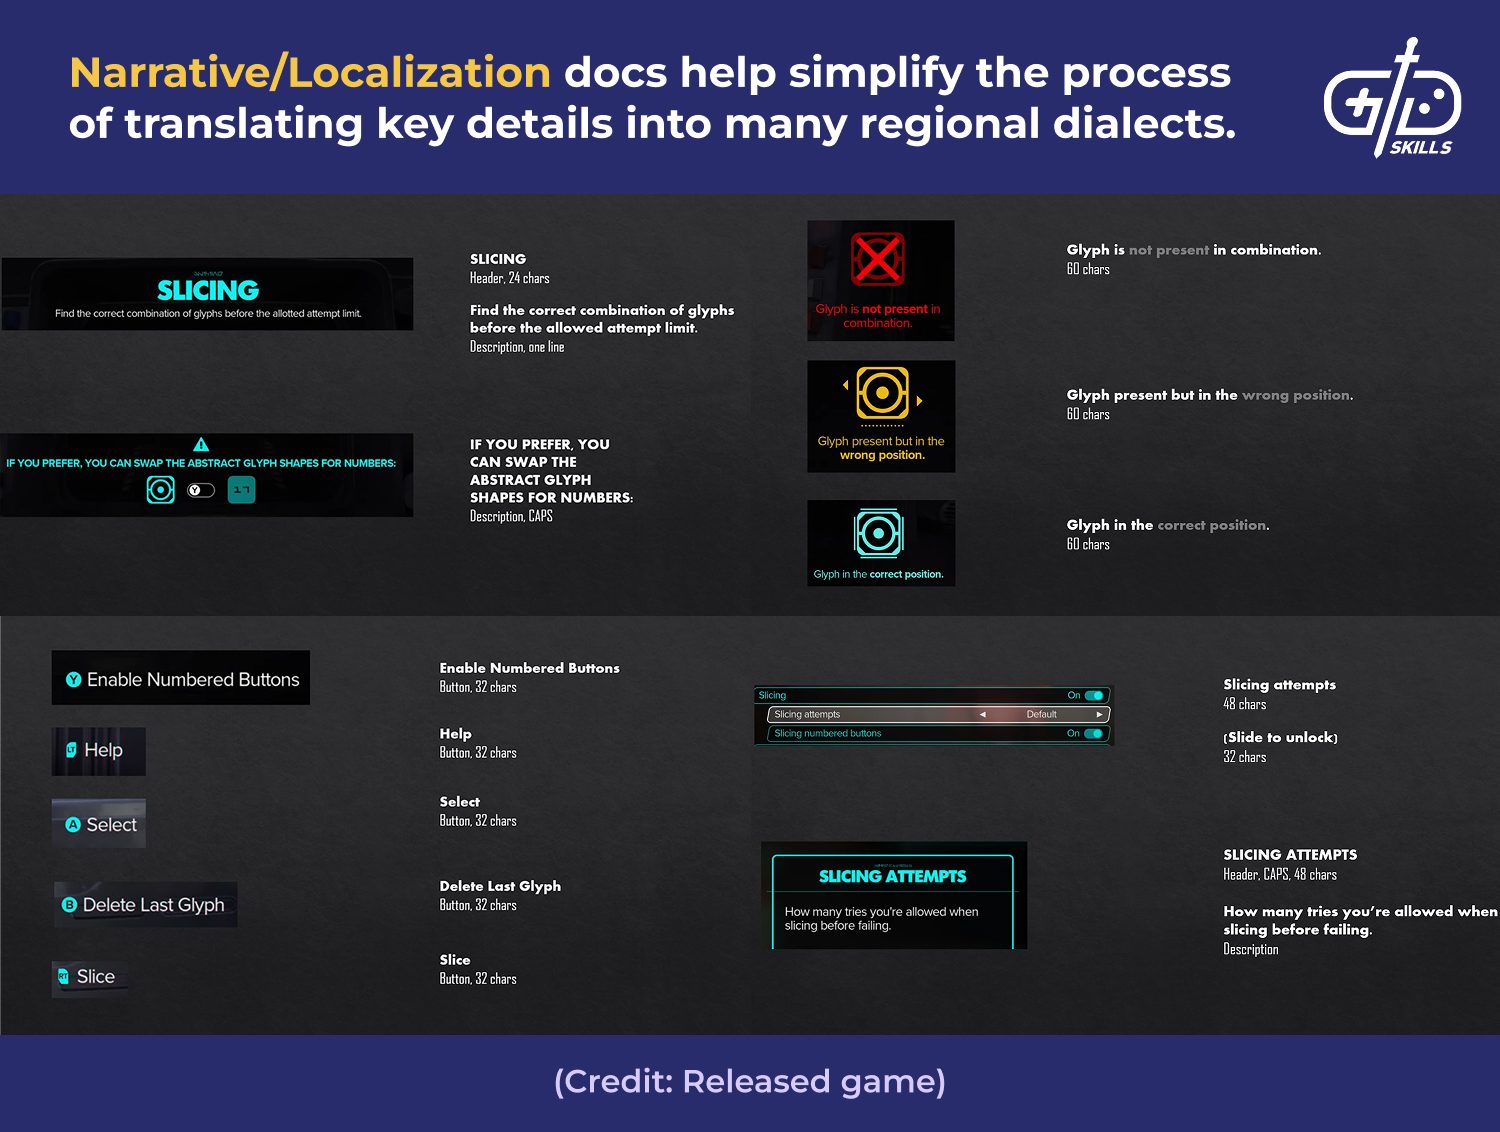
Fill each slide of the Narrative/Localization Doc with one screenshot of a UI piece, descriptive text, and UI restrictions. Being extremely thorough here helps ease the transition from placeholder info to the final storyline and lore descriptions. It’s a strong sign of good will to include this doc.
Remember that developer-facing narrative text is different from player-facing narrative text. Game Designers insert all names relating to the feature in the early stages of development. Few Game Designers are fluent in High Valerian/the game-specific lore language.
Ostap Dovbush, Senior Game Designer at Ubisoft, generously shared his expertise to lay out the above 9-step process of creating a GDD for a AAA studio.
What is the best software to make a game design document?
The best software to make a game design document are the tools that help you convey your ideas most effectively. Software like Google Docs, MS Word and OneNote are the fastest way to collect your initial game design concepts. AI “all-in-one” tools like Document360 and Xmind help organize the information into a thorough game design document your team builds together.
Use MediaWiki to find and compare game design media. The best software to create in-game art assets are typically feature-rich graphic design programs like Adobe Photoshop and Illustrator. Use this helpful comparison to understand the kind of design work each is best suited to.
Choose software like Notion and Nuclino for collaborative projects. Organizational software enables quick communication between team members. Tools like MilaNote use visual boards to help lay out the project’s creative aspects. Confluence and PowerPoint are more popular software in larger teams and studios.
Is a GDD necessary for game development?
Yes, a game design document is necessary for game development. The GDD is a necessity that ensures clear communication. Maintaining an up-to-date GDD is crucial for keeping your team on the same page, among other benefits.
Remember that a game design document is the industry standard for organizing all the critical details about your game or feature. Create a GDD for a game or feature to show that you’re ready to move onto the development stage.
Make sure your GDD highlights the project’s best features succinctly. Cover every last detail if you’re serious about convincing an actual studio to help develop your game. Making a game without a GDD isn’t physically impossible, but removing the structure a GDD provides always damages the final result.


6 Responses
I was expecting to see more complete GDD instructions than just the feature docs section. Other than that it’s a great post.
Thanks for the feedback, we’re in progress of updating to cover the entire Game Design Document set in the current context.
Just want to say that this is a great advice that’s applicable in real life!
I just starting a RPG game project (in the indie game and mobile game category). I specifically focus on level design
Also do you guys have any tips on the game design process? I don’t have a clear idea…
You should check out our classes. We teach core design process.
Thanks for the article. it’s helpful.
The full document wiki of “Dawn of the Phalanx” is not working. please fix it.
The link for the full document GDD for “Dawn of The Phalanx” is broken. Please fix it